

Day 48: Bulletproofing Your Quiz Platform

Error Handling That Actually Works
Welcome back! Today we’re adding the invisible magic that separates amateur apps from production-ready systems. Think about it: when was the last time Netflix showed you a blank screen when your internet hiccuped? Or when Google Search just crashed instead of suggesting “Did you mean...”? That’s what we’re building today.
What You’re Building Today
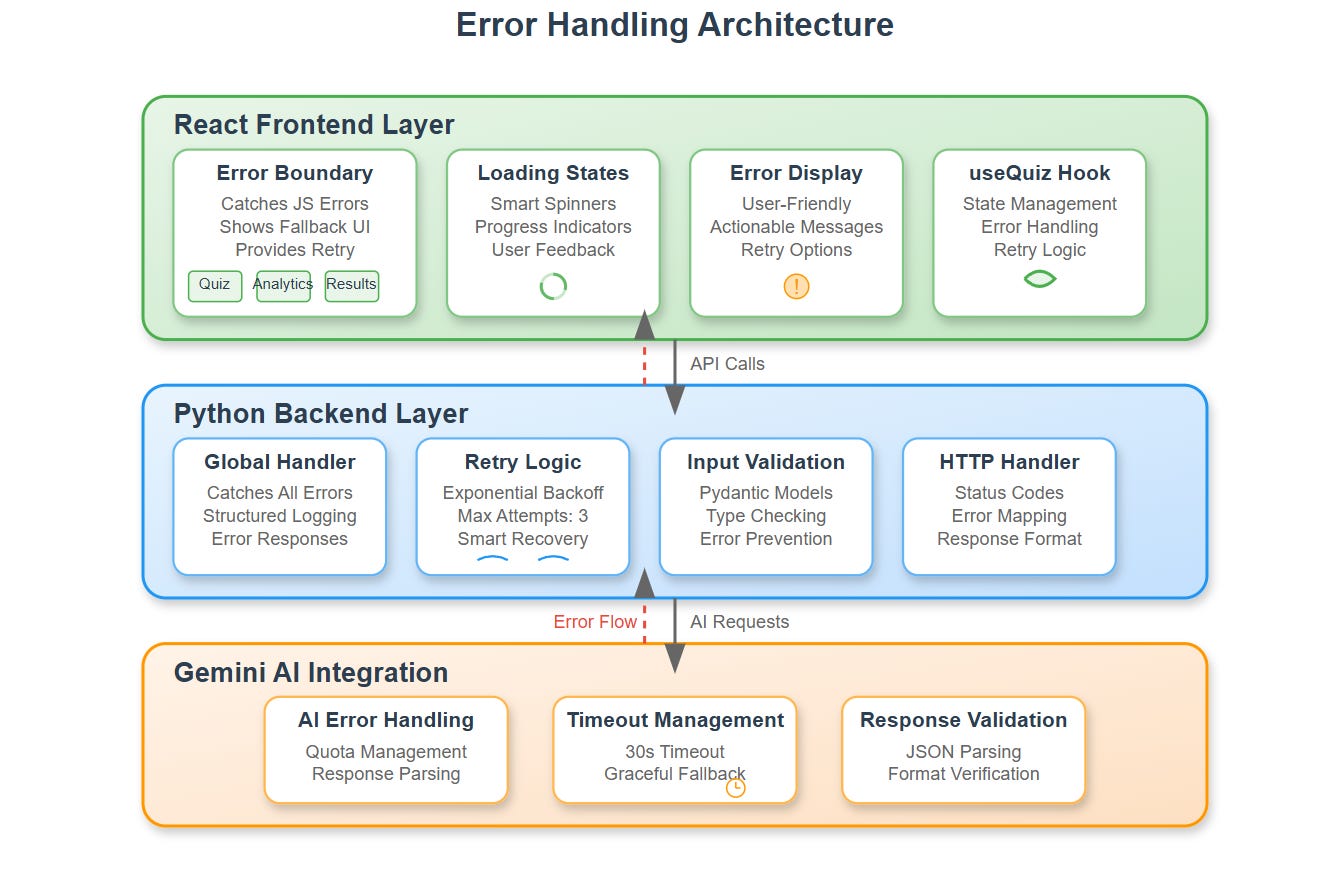
By the end of this lesson, your quiz platform will handle failures like a pro:
React Error Boundaries that catch crashes before users see them
Smart loading states that keep users engaged during API calls
Graceful error recovery that turns failures into learning opportunities
User-friendly feedback that replaces cryptic errors with helpful messages
Why This Matters in Real Systems
Ever noticed how well-designed apps never leave you wondering what’s happening? When you submit a form, you see a spinner. When something breaks, you get a clear message with a retry button. This isn’t accidental—it’s carefully crafted error handling.
In your quiz platform, students might lose internet mid-quiz, APIs might timeout, or JavaScript might encounter unexpected data. Without proper handling, these scenarios create frustrated users who close the app and never come back. Research shows users abandon apps after just 3 seconds of unclear waiting.
Your platform needs to communicate what’s happening at every step.
The Psychology Behind Loading States
Here’s something interesting: users actually perceive apps as faster when they see something happening. A spinner tells users “we’re working on it”—silence tells them “something’s broken.”
When your quiz platform generates questions using Gemini AI, that API call might take 2-5 seconds. Without a loading state, users will click the button multiple times, refresh the page, or assume the app is broken. With a proper loading state showing “Generating your personalized quiz...”, those same 2-5 seconds feel reasonable.
This is the difference between a 1-star review (”App doesn’t work!”) and a 5-star review (”Love how smooth this is!”).
Understanding Error Boundaries
Let’s talk about Error Boundaries—they’re like safety nets for your React components. Imagine you’re building a house of cards. Without an error boundary, one falling card brings down the entire structure. With error boundaries, you catch that falling card and the rest stays standing.
Here’s how they work:
// This wraps your quiz component in a safety net
<ErrorBoundary fallback={<QuizErrorFallback />}>
  <QuizContainer />
</ErrorBoundary>
When any child component throws an error—whether it’s from bad data, a null reference, or anything else—the boundary catches it and shows a friendly fallback UI instead of crashing your entire app. This becomes crucial when integrating with AI APIs where responses might be unpredictable.
Smart Loading States Architecture
Your quiz platform has multiple async operations happening:
Fetching questions from Gemini AI (2-5 seconds)
Submitting answers to backend (0.5-1 second)
Loading analytics data (1-2 seconds)
Processing quiz results (1-3 seconds)
Each needs its own loading state with appropriate messaging. A question fetch shows “Preparing your quiz...” while result processing shows “Analyzing your performance...” See the difference? Users know exactly what’s happening at each stage.
Component-Level Error Handling
Every single API call in your platform gets wrapped with this pattern:
const [loading, setLoading] = useState(false);
const [error, setError] = useState(null);

const fetchQuizData = async () => {
  try {
    setLoading(true);
    setError(null);
    const response = await geminiAPI.generateQuiz(topic);
    // Handle success
  } catch (err) {
    setError(’Unable to generate quiz. Try a different topic?’);
  } finally {
    setLoading(false);
  }
};
This becomes your standard approach. Notice how we:
Show loading before the call
Clear any previous errors
Handle the success case
Catch errors with friendly messages
Always hide loading when done (success or failure)
Production-Ready Error Messages
Here’s a secret from the pros: never show raw API errors to users. Instead, translate them:
Instead of “500 Internal Server Error” → show “Something went wrong on our end. Please try again.”
Instead of “Network request failed” → show “Check your internet connection and retry.”
Instead of “Rate limit exceeded” → show “Taking longer than usual. Please wait a moment.”
Users don’t care about HTTP status codes. They want to know what happened and what they can do about it.
Integration with Your Analytics Dashboard
Remember the analytics dashboard you built yesterday? Now it gets enhanced with error handling. When chart data fails to load, instead of showing an empty screen, your dashboard displays:
Alternative data views using cached information
A clear error message: “Unable to refresh latest data”
A manual refresh button so users can retry
Graceful degradation—other charts still work even if one fails
Real-World Context
Let’s see how major platforms handle millions of errors daily:
Twitter: Shows “Something went wrong” with retry buttons—never leaves you with a blank screen
YouTube: Continues playing your video while buffering in the background—you barely notice network hiccups
Discord: Maintains chat functionality even during server issues—messages queue and send when connection returns
Your quiz platform applies these same principles at smaller scale. You’re learning industry-standard patterns that work at any scale.
Getting Your Hands Dirty: Implementation
Alright, enough theory. Let’s build this thing. Open your terminal and get ready.
Github Link :
https://github.com/sysdr/aie/tree/main/day48/ai-quiz-platformStep 1: Project Setup (5 minutes)
First, run the implementation script to create your complete project structure:
chmod +x day48_implementation_script.sh
./day48_implementation_script.sh
You should see output like:
🚀 Day 48: Implementing Error Handling and Loading States
==================================================
📁 Creating project structure...
✅ Implementation script created successfully!
Step 2: Backend Setup with Error Handling (5 minutes)
Navigate to the backend and set up your Python environment:
cd ai-quiz-platform/backend
python3 -m venv venv
source venv/bin/activate
pip install -r requirements.txt
Expected output:
Successfully installed fastapi-0.104.1 uvicorn-0.24.0 [...]
Now test your error handling endpoints:
python -m pytest tests/test_error_handling.py -v
You should see:
test_health_endpoint PASSED
test_generate_quiz_invalid_topic PASSED
test_submit_answer_missing_fields PASSED
test_analytics_empty_quiz_id PASSED
All green? Perfect! Your backend error handling is working.
Start the backend server:
python app/main.py
Look for:
INFO:     Started server process
INFO:     Uvicorn running on http://0.0.0.0:8000
Keep this terminal open and running.
Step 3: Frontend Error Boundaries (5 minutes)
Open a new terminal window and navigate to the frontend:
cd ai-quiz-platform/frontend
npm install
This installs all your React dependencies including error handling libraries. Takes about 1-2 minutes.
Run the frontend tests:
npm test -- --run
Expected output:
PASS  src/__tests__/ErrorBoundary.test.js
  ✓ renders children when there is no error
  ✓ renders error UI when there is an error
  ✓ retry functionality works
Build and start your frontend:
npm run build
npm start
You’ll see:
Compiled successfully!
The app is running at:
  http://localhost:3000
Step 4: Testing Error Scenarios (10 minutes)
Now for the fun part—breaking things on purpose to see your error handling in action!
Test 1: Health Check
Open a new terminal:
curl http://localhost:8000/health
Should return:
{
  “status”: “healthy”,
  “timestamp”: 1234567890,
  “service”: “ai-quiz-platform”
}
Test 2: Validation Error
Try sending invalid data:
curl -X POST http://localhost:8000/api/generate-quiz \
  -H “Content-Type: application/json” \
  -d ‘{”topic”: “”, “difficulty”: “medium”}’
You’ll get a nice error response:
{
  “error”: “http_error”,
  “error_code”: “HTTP_400”,
  “message”: “Topic must be at least 2 characters long”
}
See how it’s user-friendly? Not just “400 Bad Request”—it tells you exactly what’s wrong.
Test 3: Loading States
Open your browser to http://localhost:3000
Watch what happens when you generate a quiz:
Click “Generate Quiz” button
Immediately see: “Generating your personalized quiz...” with a spinner
After 2-3 seconds, questions appear
Try it a few times. Notice how the loading state makes the wait feel shorter?
Test 4: Network Error Simulation
Here’s where it gets interesting. With the app open:
Open browser developer tools (F12 or right-click → Inspect)
Go to Network tab
Change throttling from “No throttling” to “Offline”
Try generating a quiz
You should see:
A friendly error message: “Unable to connect to server. Please check your internet connection.”
A retry button with a refresh icon
No blank screens or crashes
Change back to “No throttling” and click retry—it works!
Test 5: Error Boundary
Let’s intentionally crash a component:
Open browser console (F12)
In the console, type:
throw new Error(’Test error’)Your Error Boundary catches it!
You see: “Something went wrong” with a “Try Again” button
App doesn’t crash—other parts keep working
This is huge. In production, unexpected errors happen. Your boundary keeps the app alive.
Step 5: Integration Testing (5 minutes)
Test the complete flow:
# Generate a quiz
curl -X POST http://localhost:8000/api/generate-quiz \
  -H “Content-Type: application/json” \
  -d ‘{
    “topic”: “JavaScript”,
    “difficulty”: “medium”,
    “num_questions”: 5
  }’
Save the quiz_id from the response, then test analytics:
curl http://localhost:8000/api/analytics/quiz_12345
Both should work smoothly with proper error handling if anything fails.
Step 6: Docker Deployment (Optional)
Want to deploy with Docker? Run this instead:
cd ai-quiz-platform
./build.sh docker
Docker will:
Build backend container
Build frontend container
Start both services
Set up networking between them
Verify it’s running:
docker-compose ps
Should show:
Name                State    Ports
backend_1          Up       0.0.0.0:8000->8000/tcp
frontend_1         Up       0.0.0.0:3000->80/tcp
Success Checklist
Go through this list and check off each item:
Backend Error Handling:
☐ All tests pass
☐ Health endpoint responds
☐ Validation errors return friendly messages
☐ Retry logic works with exponential backoff
☐ Structured error logging in place
Frontend Error Management:
☐ Error Boundaries catch component crashes
☐ Loading states show during API calls
☐ Error messages are user-friendly
☐ Retry buttons work properly
☐ Network errors handled gracefully
User Experience:
☐ No blank screens ever appear
☐ Loading indicators inform users
☐ Error messages are actionable
☐ Users can recover from all error states
☐ App maintains functionality during partial failures
Integration:
☐ Frontend connects to backend successfully
☐ CORS configured properly
☐ API error responses formatted correctly
☐ Error codes consistent across system
Working Code Demo :
Troubleshooting Common Issues
Backend won’t start?
cd backend
source venv/bin/activate
pip install --upgrade -r requirements.txt
python app/main.py
Frontend build fails?
cd frontend
rm -rf node_modules package-lock.json
npm install
npm start
Port already in use?
# Kill existing processes
pkill -f “python app/main.py”
pkill -f “npm start”

# Or use different ports
PORT=3001 npm start  # For frontend
uvicorn app.main:app --port 8001  # For backend
Docker issues?
docker-compose down
docker-compose build --no-cache
docker-compose up -d
Assignment Challenge
Time to level up! Implement a “Smart Retry” system that goes beyond basic retry:
Requirements:
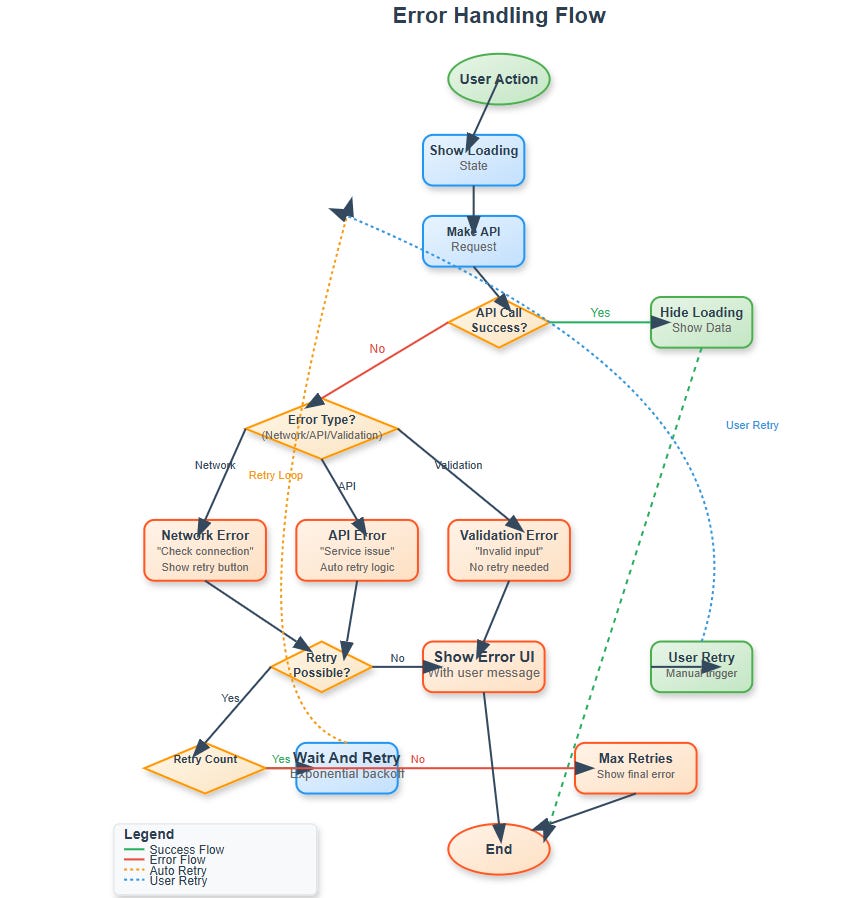
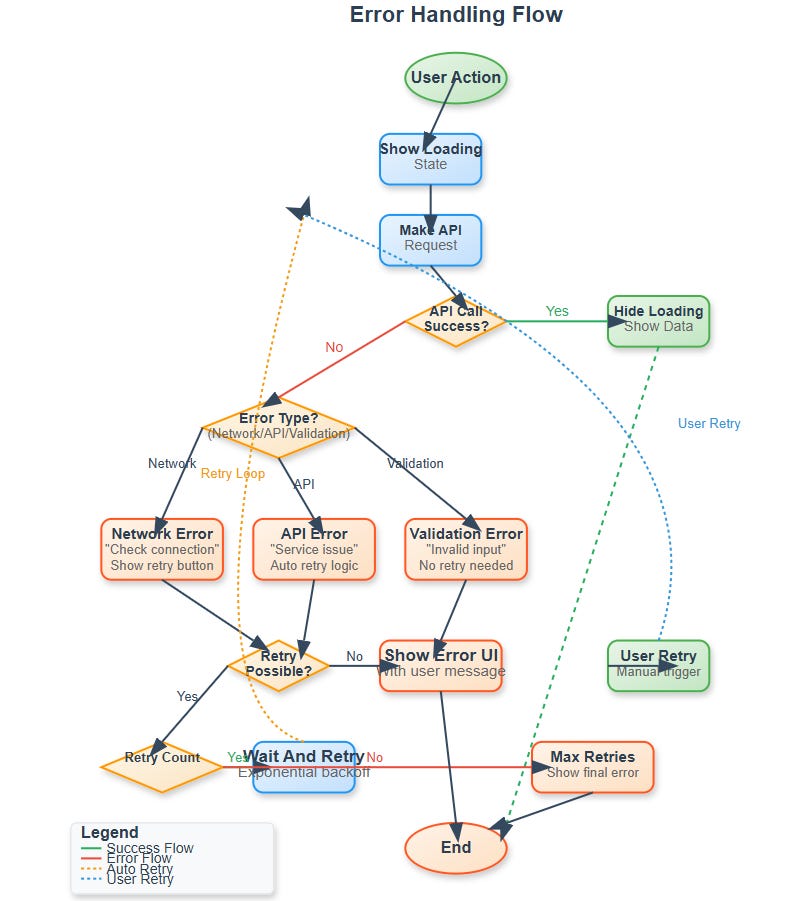
Automatically retry failed API calls with exponential backoff (1s, 2s, 4s)
Show different messages for different error types (network vs API vs validation)
Provide manual retry buttons with loading indicators
Log errors to help debug issues in production
Bonus Points:
Add a “Report Problem” button that captures error details
Implement a retry counter that shows users “Retry 1 of 3”
Cache successful responses so users can continue working offline
Add error recovery analytics to track what fails most often
Solution Hints:
For exponential backoff:
const delay = (ms) => new Promise(resolve => setTimeout(resolve, ms));
const retryWithBackoff = async (fn, maxRetries = 3) => {
  for (let i = 0; i < maxRetries; i++) {
    try {
      return await fn();
    } catch (error) {
      if (i === maxRetries - 1) throw error;
      await delay(Math.pow(2, i) * 1000);
    }
  }
};
For error type detection:
const getErrorType = (error) => {
  if (!error.response) return ‘network’;
  if (error.response.status >= 500) return ‘server’;
  if (error.response.status === 429) return ‘rate_limit’;
  return ‘client’;
};
What You Built Today
Take a moment to appreciate what you’ve accomplished:
You built a production-grade error handling system that:
Never crashes, even when components fail
Keeps users informed during every operation
Recovers gracefully from network issues
Provides clear, actionable error messages
Works at scale with proper retry logic
These patterns work the same whether you’re building for 10 users or 10 million users. You’re learning real industry skills.
Tomorrow: Bringing It All Together
Day 49 takes everything you’ve built over the past 48 days and integrates it into one cohesive system. Your error handling ensures that even when individual pieces face issues, the overall system keeps running smoothly.
You’ll see how proper error boundaries make debugging integration problems much easier, and how smart loading states create professional user experiences during complex operations.
Key Takeaways
For Engineers: Error handling isn’t optional—it’s what separates hobby projects from production systems. Master the try-catch-finally pattern and always think about failure cases.
For Designers: Loading states and error messages are part of your design. Users should never wonder what’s happening or feel lost when things go wrong.
For Product Managers: Every error is a conversation with your user. Make those conversations helpful, not frustrating. Good error handling reduces support tickets and improves retention.
For Everyone: Great error handling is invisible when everything works, invaluable when things go wrong. It’s the safety net that lets you ship with confidence.
Now get out there and make your apps bulletproof!