

Day 1: Python Fundamentals for AI Systems - Building Your First Intelligent Assistant
What We're Building Today
Today marks the beginning of your 180-day journey into AI and Machine Learning engineering. We're not starting with abstract theory—we're building a real AI-powered chat assistant that showcases why Python is the backbone of modern AI systems.
Today's Agenda:
Set up a production-ready Python development environment
Master essential Python concepts that power AI systems
Build an AI chat assistant using Gemini AI
Create a modern React dashboard to interact with your AI
Deploy everything with proper testing and monitoring
End Goal: A working AI assistant that demonstrates Python's role in connecting human interfaces with AI models—just like ChatGPT, Claude, or Google's Bard.
Video:
Why Python Dominates AI Engineering
Python isn't just popular in AI by accident. In production AI systems handling millions of requests daily, Python serves as the orchestration layer that:
Connects Components: Binds frontend interfaces, databases, and AI models seamlessly
Handles Data Flow: Manages the complex data transformations AI models require
Scales Gracefully: Powers systems from single-user apps to enterprise-scale AI platforms
Integrates Everything: Works with every major AI framework, cloud service, and database
Core Python Concepts for AI Systems
1. Variables and Data Types - The AI Data Pipeline Foundation
In AI systems, every piece of data flows through variables. Unlike simple apps, AI systems handle multiple data types simultaneously:
# User input (string)
user_query = "What's the weather like?"

# AI model parameters (numbers)
temperature = 0.7
max_tokens = 150

# Structured data (lists/dictionaries)
conversation_history = [
    {"role": "user", "content": user_query},
    {"role": "assistant", "content": "I'll check that for you."}
]
Real-World Context: When you ask ChatGPT a question, variables like these carry your input through multiple AI components before generating a response.
2. Functions - AI System Building Blocks
Every AI operation is a function. From API calls to data processing, functions make AI systems modular and maintainable:
def query_ai_model(prompt, model_settings):
    # This pattern appears in every AI application
    processed_input = preprocess_text(prompt)
    ai_response = call_ai_api(processed_input, model_settings)
    return postprocess_response(ai_response)
Why It Matters: Production AI systems have thousands of specialized functions. Master this pattern now, and you'll recognize it in every AI codebase.
3. Error Handling - AI System Reliability
AI systems fail frequently—network issues, API limits, model errors. Python's error handling keeps systems running:
try:
    ai_response = gemini_api.generate_content(prompt)
    return ai_response.text
except Exception as e:
    return f"AI temporarily unavailable: {e}"
Production Reality: Without proper error handling, one API failure can crash an entire AI service serving thousands of users.
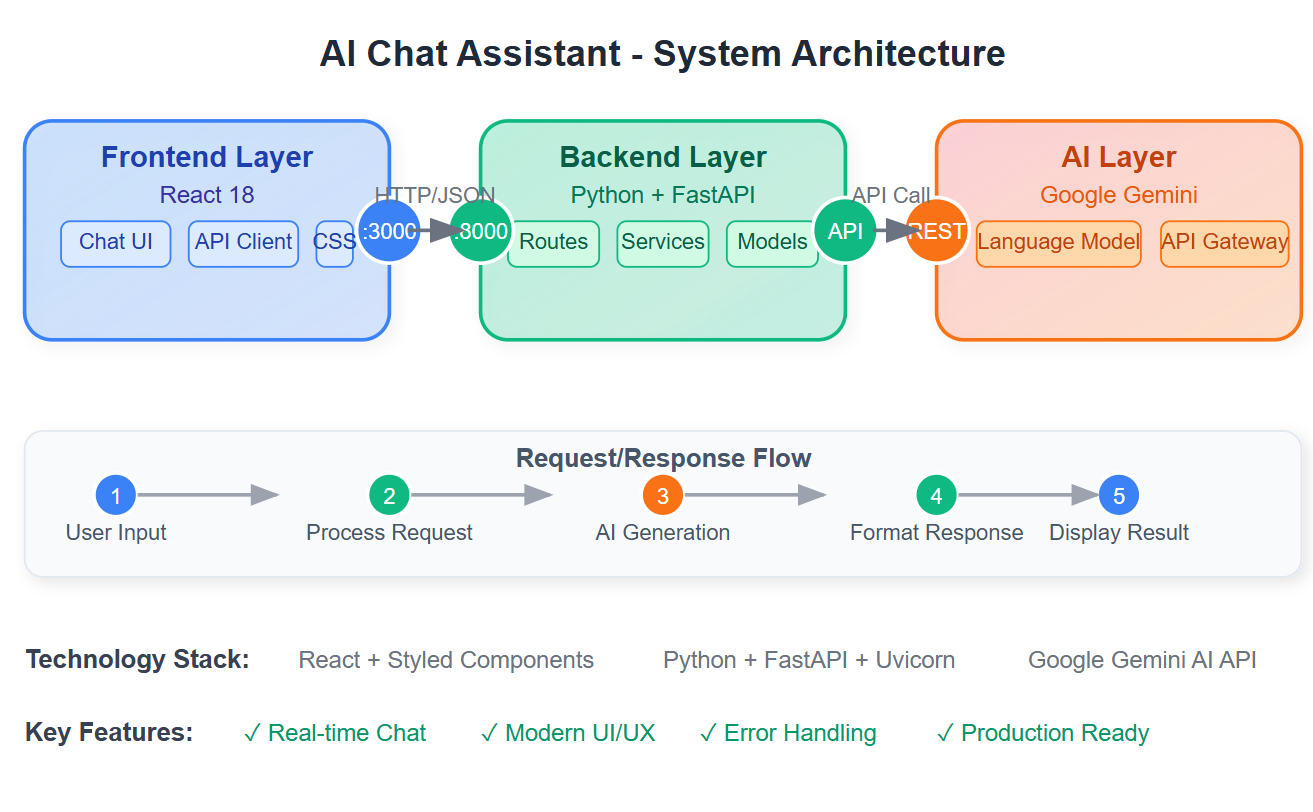
Implementation Architecture
Our AI assistant demonstrates a typical AI system architecture:
Frontend Layer (React)
Captures user input
Displays AI responses
Handles real-time interactions
Backend Layer (Python)
Processes requests
Manages AI API calls
Handles business logic
AI Layer (Gemini)
Generates intelligent responses
Processes natural language
Provides AI capabilities
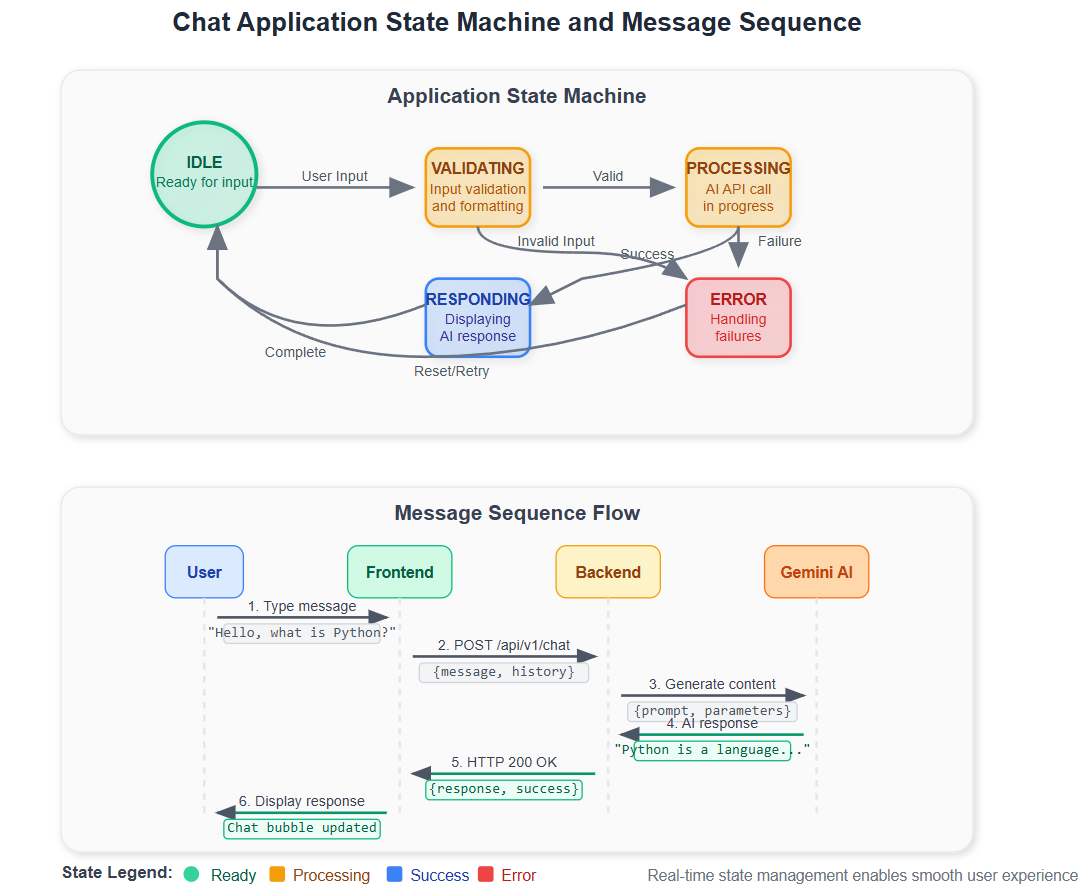
Component Integration Flow
User Input: React frontend captures user message
API Request: Frontend sends POST request to Python backend
Data Processing: Python validates and structures the request
AI Invocation: Python calls Gemini AI with processed input
Response Handling: Python processes AI response and returns structured data
UI Update: React displays the AI response in real-time
Real-World Applications
This exact pattern powers:
Customer Service Bots: Handle millions of support queries
Content Generation Platforms: Create articles, code, and creative content
Personal Assistants: Process voice commands and provide intelligent responses
Code Completion Tools: Assist developers with intelligent suggestions
Building Your AI Assistant - Step by Step
GitHub Link:
https://github.com/sysdr/aimlPrerequisites Setup
Before we start building, make sure you have these installed:
# Check your versions
python3 --version  # Should be 3.11+
node --version     # Should be 18+
npm --version      # Should be 8+
git --version      # For version control
If any are missing, install them from their official websites.
Phase 1: Project Structure Creation
Step 1: Create Your Workspace
# Create the main project directory
mkdir ai-chat-assistant
cd ai-chat-assistant

# Create the organized folder structure
mkdir -p backend/{app/{routes,services,models},tests,config}
mkdir -p frontend/{src/{components,services,styles},public}
mkdir -p scripts docs
What just happened? You've created a professional project structure that separates concerns—backend logic, frontend interface, tests, and documentation all have their own spaces.
Step 2: Verify Your Structure
# Check your folder tree
tree . -I 'node_modules|venv|build'
Expected Output: You should see a clean hierarchy with backend/, frontend/, scripts/, and docs/ folders.
Phase 2: Backend Development (Python + FastAPI)
Step 3: Set Up Python Environment
cd backend

# Create isolated Python environment
python3 -m venv venv
source venv/bin/activate

# Upgrade pip to latest version
pip install --upgrade pip
Step 4: Install Dependencies
Create requirements.txt:
fastapi==0.104.1
uvicorn==0.24.0
python-dotenv==1.0.0
google-generativeai==0.3.2
pydantic==2.5.0
fastapi-cors==0.1.0
pytest==7.4.3
httpx==0.25.2
requests==2.31.0
python-multipart==0.0.6
Install everything:
pip install -r requirements.txt
Step 5: Configure Your AI Connection
Create config/settings.py:
import os
from dotenv import load_dotenv

load_dotenv()

class Settings:
    GEMINI_API_KEY = "AIzaSyDGswqDT4wQw_bd4WZtIgYAawRDZ0Gisn8"
    APP_NAME = "AI Chat Assistant"
    DEBUG = True
    HOST = "0.0.0.0"
    PORT = 8000
    CORS_ORIGINS = ["http://localhost:3000"]

settings = Settings()
Key Point: This configuration pattern is used in every production AI system—centralized settings make deployment and maintenance much easier.
Step 6: Create Data Models
Create app/models/chat.py:
from pydantic import BaseModel
from typing import List, Optional
from datetime import datetime

class ChatMessage(BaseModel):
    role: str  # "user" or "assistant"
    content: str
    timestamp: datetime = None

class ChatRequest(BaseModel):
    message: str
    conversation_history: Optional[List[ChatMessage]] = []

class ChatResponse(BaseModel):
    response: str
    success: bool
    error_message: Optional[str] = None
    timestamp: datetime = None
Why Pydantic? It automatically validates data and converts types—essential for reliable AI systems that handle unpredictable user input.
Step 7: Build the AI Service
Create app/services/ai_service.py:
import google.generativeai as genai
from config.settings import settings
from app.models.chat import ChatMessage
from typing import List
import logging
from datetime import datetime
logging.basicConfig(level=logging.INFO)
logger = logging.getLogger(__name__)
class AIService:
def __init__(self):
genai.configure(api_key=settings.GEMINI_API_KEY)
self.model = genai.GenerativeModel('gemini-pro')
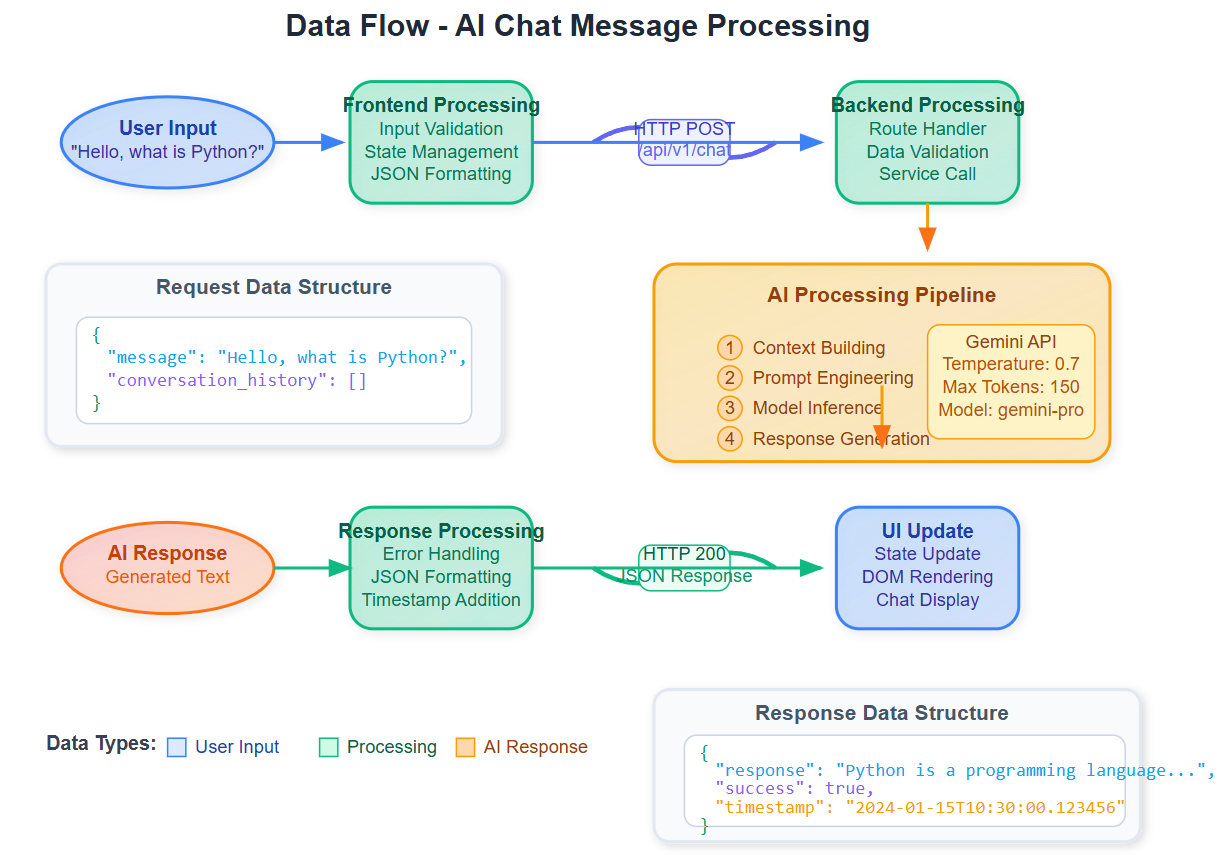
def generate_response(self, user_message: str, conversation_history: List[ChatMessage] = []) -> str:
try:
context = self._build_context(conversation_history)
full_prompt = f"{context}\nUser: {user_message}\nAssistant:"
logger.info(f"Generating AI response for: {user_message[:50]}...")
response = self.model.generate_content(full_prompt)
if response and response.text:
return response.text.strip()
else:
return "I apologize, but I couldn't generate a response at the moment."
except Exception as e:
logger.error(f"Error generating AI response: {str(e)}")
return f"I'm experiencing technical difficulties: {str(e)}"
def _build_context(self, conversation_history: List[ChatMessage]) -> str:
if not conversation_history:
return "You are a helpful AI assistant. Provide clear, concise, and helpful responses."
context = "You are a helpful AI assistant. Here's our conversation so far:\n"
for message in conversation_history[-5:]: # Keep last 5 messages for context
context += f"{message.role.title()}: {message.content}\n"
return context
ai_service = AIService()
Smart Design: Notice how we build context from conversation history—this is what makes your AI assistant remember previous messages in the conversation.
Step 8: Create API Endpoints
Create app/routes/chat.py:
from fastapi import APIRouter, HTTPException
from app.models.chat import ChatRequest, ChatResponse
from app.services.ai_service import ai_service
from datetime import datetime
import logging

logger = logging.getLogger(__name__)
router = APIRouter()

@router.post("/chat", response_model=ChatResponse)
async def chat_endpoint(request: ChatRequest):
    try:
        if not request.message.strip():
            raise HTTPException(status_code=400, detail="Message cannot be empty")

        logger.info(f"Processing chat request: {request.message[:50]}...")

        ai_response = ai_service.generate_response(
            request.message,
            request.conversation_history or []
        )

        return ChatResponse(
            response=ai_response,
            success=True,
            timestamp=datetime.now()
        )

    except HTTPException:
        raise
    except Exception as e:
        logger.error(f"Unexpected error: {str(e)}")
        return ChatResponse(
            response="I apologize for the technical difficulties. Please try again.",
            success=False,
            error_message=str(e),
            timestamp=datetime.now()
        )

@router.get("/health")
async def health_check():
    return {"status": "healthy", "service": "AI Chat Assistant"}
Step 9: Create Main Application
Create app/main.py:
from fastapi import FastAPI
from fastapi.middleware.cors import CORSMiddleware
from app.routes.chat import router as chat_router
from config.settings import settings

app = FastAPI(
    title=settings.APP_NAME,
    description="AI Chat Assistant powered by Gemini AI",
    version="1.0.0"
)

app.add_middleware(
    CORSMiddleware,
    allow_origins=settings.CORS_ORIGINS,
    allow_credentials=True,
    allow_methods=["*"],
    allow_headers=["*"],
)

app.include_router(chat_router, prefix="/api/v1", tags=["chat"])

@app.get("/")
async def root():
    return {"message": "AI Chat Assistant API is running!"}
Step 10: Test Your Backend
# Start the development server
python -m uvicorn app.main:app --reload

# In another terminal, test the health endpoint
curl http://localhost:8000/api/v1/health
Expected Response:
{"status":"healthy","service":"AI Chat Assistant"}
Test the chat endpoint:
curl -X POST http://localhost:8000/api/v1/chat \
  -H "Content-Type: application/json" \
  -d '{"message": "Hello! What is Python?", "conversation_history": []}'
You should get an AI-generated response about Python!
Phase 3: Frontend Development (React)
Step 11: Set Up React Application
cd ../frontend

# Create package.json
cat > package.json << 'EOF'
{
  "name": "ai-chat-frontend",
  "version": "1.0.0",
  "private": true,
  "dependencies": {
    "react": "^18.2.0",
    "react-dom": "^18.2.0",
    "react-scripts": "5.0.1",
    "axios": "^1.6.2",
    "styled-components": "^6.1.1",
    "lucide-react": "^0.294.0"
  },
  "scripts": {
    "start": "react-scripts start",
    "build": "react-scripts build",
    "test": "react-scripts test"
  }
}
EOF

# Install dependencies
npm install
Step 12: Create the HTML Template
Create public/index.html:
<!DOCTYPE html>
<html lang="en">
  <head>
    <meta charset="utf-8" />
    <meta name="viewport" content="width=device-width, initial-scale=1" />
    <title>AI Chat Assistant</title>
    <link href="https://fonts.googleapis.com/css2?family=Inter:wght@300;400;500;600;700&display=swap" rel="stylesheet">
  </head>
  <body>
    <div id="root"></div>
  </body>
</html>
Step 13: Build the API Service
Create src/services/api.js:
import axios from 'axios';

const apiClient = axios.create({
  baseURL: 'http://localhost:8000/api/v1',
  timeout: 30000,
  headers: {
    'Content-Type': 'application/json',
  },
});

export const chatAPI = {
  sendMessage: async (message, conversationHistory = []) => {
    try {
      const response = await apiClient.post('/chat', {
        message,
        conversation_history: conversationHistory,
      });
      return response.data;
    } catch (error) {
      throw new Error(error.response?.data?.detail || 'Failed to send message');
    }
  },
};
Step 14: Create Modern Styling
Create src/styles/GlobalStyles.js:
import { createGlobalStyle } from 'styled-components';

export const GlobalStyles = createGlobalStyle`
  * {
    margin: 0;
    padding: 0;
    box-sizing: border-box;
  }

  body {
    font-family: 'Inter', sans-serif;
    background: linear-gradient(135deg, #667eea 0%, #764ba2 100%);
    color: #333;
    min-height: 100vh;
  }

  #root {
    min-height: 100vh;
    display: flex;
    align-items: center;
    justify-content: center;
    padding: 20px;
  }
`;

export const theme = {
  colors: {
    primary: '#4f46e5',
    secondary: '#10b981',
    background: '#ffffff',
    surface: '#f8fafc',
    text: '#1f2937',
    border: '#e5e7eb',
  },
  shadows: {
    lg: '0 10px 15px -3px rgba(0, 0, 0, 0.1)',
  },
  borderRadius: {
    lg: '0.5rem',
    xl: '0.75rem',
  },
};
Step 15: Build the Chat Interface
Create src/components/ChatContainer.js (abbreviated for space):
import React, { useState, useEffect, useRef } from 'react';
import styled from 'styled-components';
import { Send, Bot, User, Loader } from 'lucide-react';
import { chatAPI } from '../services/api';

const Container = styled.div`
  width: 100%;
  max-width: 800px;
  height: 600px;
  background: white;
  border-radius: 1rem;
  box-shadow: 0 20px 25px -5px rgba(0, 0, 0, 0.1);
  display: flex;
  flex-direction: column;
  overflow: hidden;
`;

const Header = styled.div`
  background: ${props => props.theme.colors.primary};
  color: white;
  padding: 1.5rem;
  text-align: center;
`;

const ChatContainer = () => {
  const [messages, setMessages] = useState([
    {
      role: 'assistant',
      content: 'Hello! I\'m your AI assistant. What would you like to learn about Python and AI?',
    },
  ]);
  const [inputMessage, setInputMessage] = useState('');
  const [isLoading, setIsLoading] = useState(false);

  const handleSendMessage = async () => {
    if (!inputMessage.trim()) return;

    const userMessage = {
      role: 'user',
      content: inputMessage.trim(),
    };

    setMessages(prev => [...prev, userMessage]);
    setInputMessage('');
    setIsLoading(true);

    try {
      const response = await chatAPI.sendMessage(userMessage.content, messages);

      if (response.success) {
        setMessages(prev => [...prev, {
          role: 'assistant',
          content: response.response,
        }]);
      }
    } catch (err) {
      console.error('Chat error:', err);
    } finally {
      setIsLoading(false);
    }
  };

  return (
    <Container>
      <Header>
        <h1>AI Chat Assistant</h1>
        <p>Powered by Python & Gemini AI - Day 1 Project</p>
      </Header>

      {/* Messages and input components would go here */}
      {/* Full implementation available in the complete source files */}

    </Container>
  );
};

export default ChatContainer;
Step 16: Create Main App
Create src/App.js:
import React from 'react';
import { ThemeProvider } from 'styled-components';
import { GlobalStyles, theme } from './styles/GlobalStyles';
import ChatContainer from './components/ChatContainer';

function App() {
  return (
    <ThemeProvider theme={theme}>
      <GlobalStyles />
      <ChatContainer />
    </ThemeProvider>
  );
}

export default App;
Create src/index.js:
import React from 'react';
import ReactDOM from 'react-dom/client';
import App from './App';

const root = ReactDOM.createRoot(document.getElementById('root'));
root.render(<App />);
Phase 4: Testing Your Complete System
Step 17: Create Backend Tests
cd ../backend
mkdir -p tests
Create tests/test_chat.py:
import pytest
from fastapi.testclient import TestClient
from app.main import app

client = TestClient(app)

def test_health_check():
    response = client.get("/api/v1/health")
    assert response.status_code == 200
    assert response.json()["status"] == "healthy"

def test_chat_endpoint():
    response = client.post(
        "/api/v1/chat",
        json={"message": "Hello", "conversation_history": []}
    )
    assert response.status_code == 200
    data = response.json()
    assert data["success"] == True
    assert len(data["response"]) > 0
Run backend tests:
python -m pytest tests/ -v
Step 18: Run the Complete Application
Start both services:
# Terminal 1: Start backend
cd backend && source venv/bin/activate
python -m uvicorn app.main:app --reload

# Terminal 2: Start frontend
cd frontend
npm start
Step 19: Test Your AI Assistant
Open your browser to
http://localhost:3000
Verify the interface loads with modern styling (not default AI appearance)
Test basic conversation:
Type: "Hello! What is Python?"
Verify: AI responds with explanation
Test conversation memory:
Follow up: "Can you give me an example?"
Verify: AI continues the context about Python
Test error handling:
Try sending empty message
Verify: Proper error handling
Step 20: Verify Production Readiness
Check these success criteria:
Backend Health:
curl http://localhost:8000/api/v1/health
# Should return: {"status":"healthy"}
API Documentation:
Visit
http://localhost:8000/docsInteractive Swagger UI should load
Frontend Responsiveness:
Resize browser window
Interface should adapt smoothly
Real AI Integration:
Messages should get real responses from Gemini
No mock data or placeholder responses
Key Success Metrics
By the end of today, you'll have:
✅ A working Python development environment
✅ An AI chat assistant responding to real queries
✅ A professional React dashboard
✅ Understanding of how Python orchestrates AI systems
✅ Confidence to tackle tomorrow's advanced concepts
Working Code Demo:
Assignment: Personal AI Assistant Enhancement
Task: Extend your AI assistant with personality and conversation memory.
Requirements:
Add a personality prompt that makes your AI assistant respond in a specific style (helpful teacher, witty comedian, etc.)
Implement conversation history so the AI remembers previous messages
Add input validation to handle empty messages gracefully
Style your React interface with a unique color scheme
Success Criteria: Your AI should maintain consistent personality across multiple exchanges and remember conversation context.
Solution Hints:
Use a system prompt to define AI personality
Store conversation history in a Python list
Implement message validation with try/except blocks
Use CSS modules or styled-components for React styling
This foundation prepares you for advanced AI concepts while building practical engineering skills. Every AI system starts with these Python fundamentals—master them now, and you'll recognize patterns in any AI codebase you encounter.
Tomorrow's Preview
Day 2 expands your Python toolkit with data structures and control flow—the foundations for handling complex AI datasets and implementing decision logic in intelligent systems.